The Transaction History page provides the admin with an overview of the billing history and expected payments for all site members.
This article explains all the features available on this page. It can be accessed by navigating to Finance » Transaction History in the admin area.
The Transaction History page is organized into five tabs:
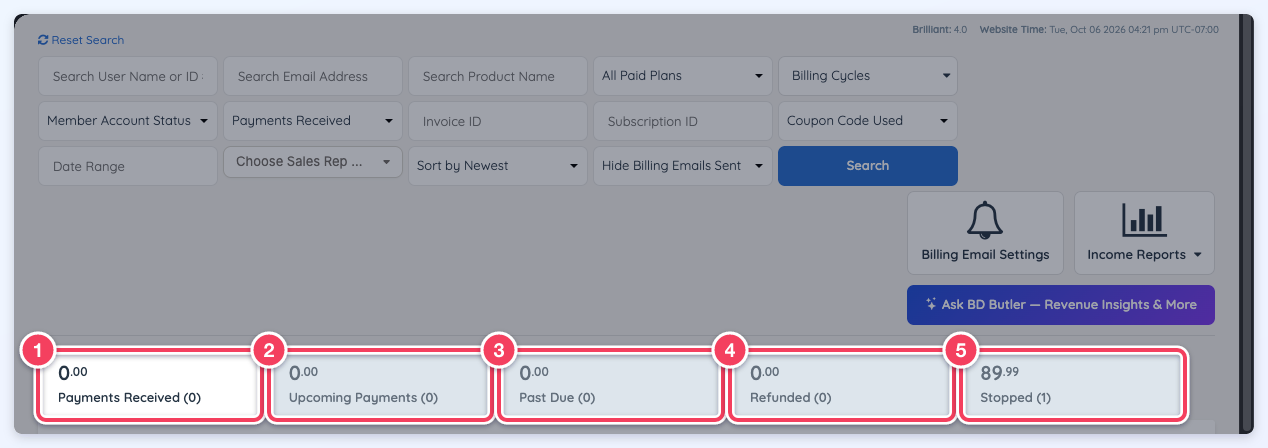
Payments Received
The Payments Received tab records all payments collected from members and displays the total amount received, which matches the Finance Snapshot in the Dashboard. This total includes payments for services like leads, pay-per-posts, digital downloads, and membership subscriptions.
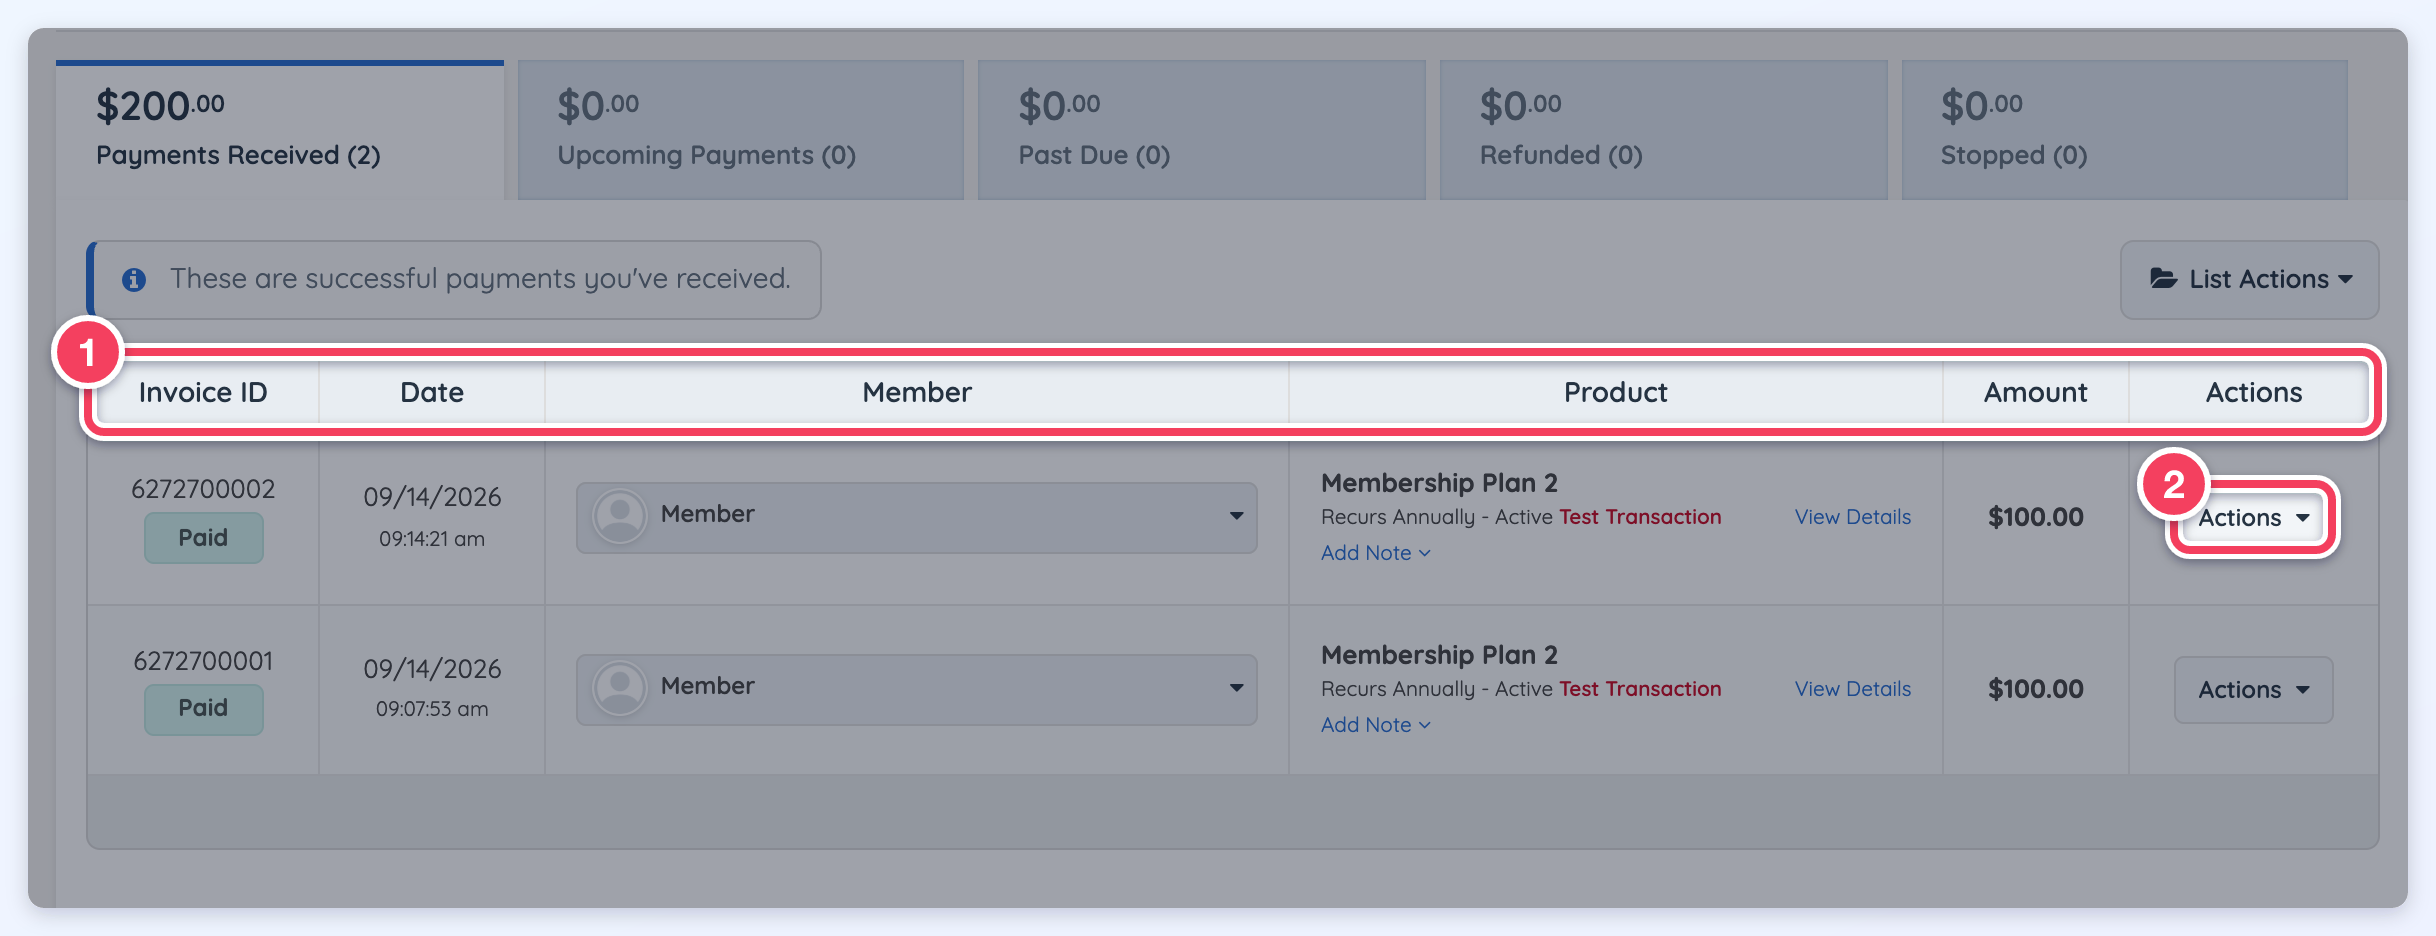
This section provides key transaction details such as Invoice ID, date paid, member’s name, product, and amount paid (1). An Actions button (2) allows the Admin to manage invoices efficiently.
Quick Actions
The Actions button (1) in the far-right column opens several invoice-related options (2).
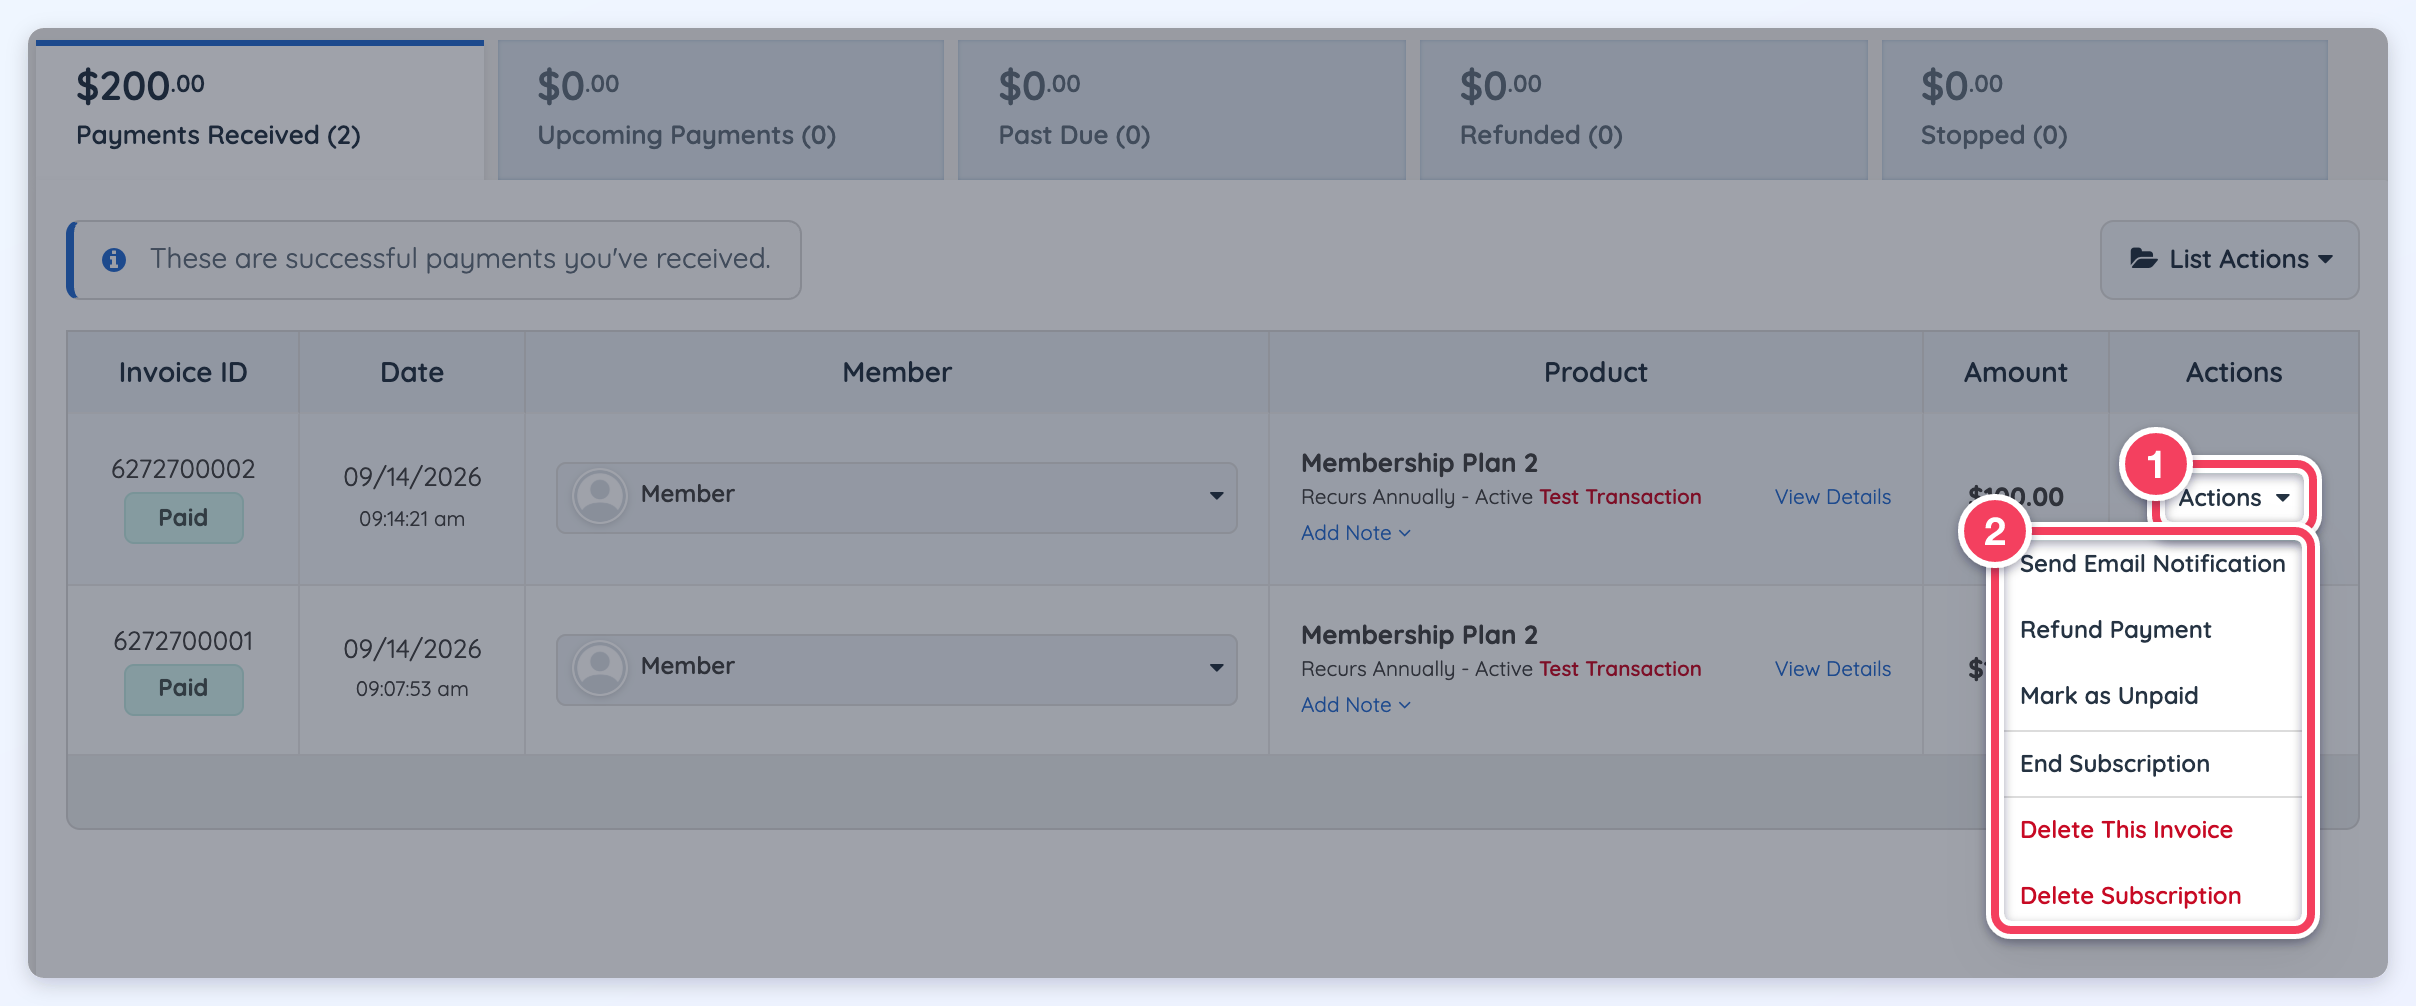
- Send Email Notification: Click this button to send an email notification to the member. It will display the Compose Email pop-up and the system will automatically use the invoice_payment_received email template when clicking this button under the Payments Received tab.
- Refund Payment: Click on this button to refund the payment to the member and label the invoice as Refunded.
- Mark as Unpaid: Mark this invoice as Unpaid. This is useful if the member disputes the charge with their bank or the payment is refunded directly through the payment gateway and not through the website. This enables an admin to track this billing event in the admin area in cases where it could not be tracked automatically. Changing the status of an invoice in this way will move the invoice to the appropriate tab (Upcoming Payments or Past Due, depending on when the invoice was originally due).
- Download Invoice: Download a copy of this invoice in PDF format. Members can also download PDF copies of invoices through their Member Dashboard in the Billing History section.
- End Subscription: Use this button to stop (Cancel) the subscription related to this invoice, and do not collect any future payments connected to this subscription. If there are unpaid invoices related to the Subscription, the system will cancel those invoices as well. Clicking it opens the Confirm End Subscription window, which has an optional Reason for cancelling box (up to 1,000 characters). A reason entered there is saved with the cancellation and shown on the Finance » Search Subscriptions page. Full steps: How Do I Cancel Payment Subscriptions - Orders.
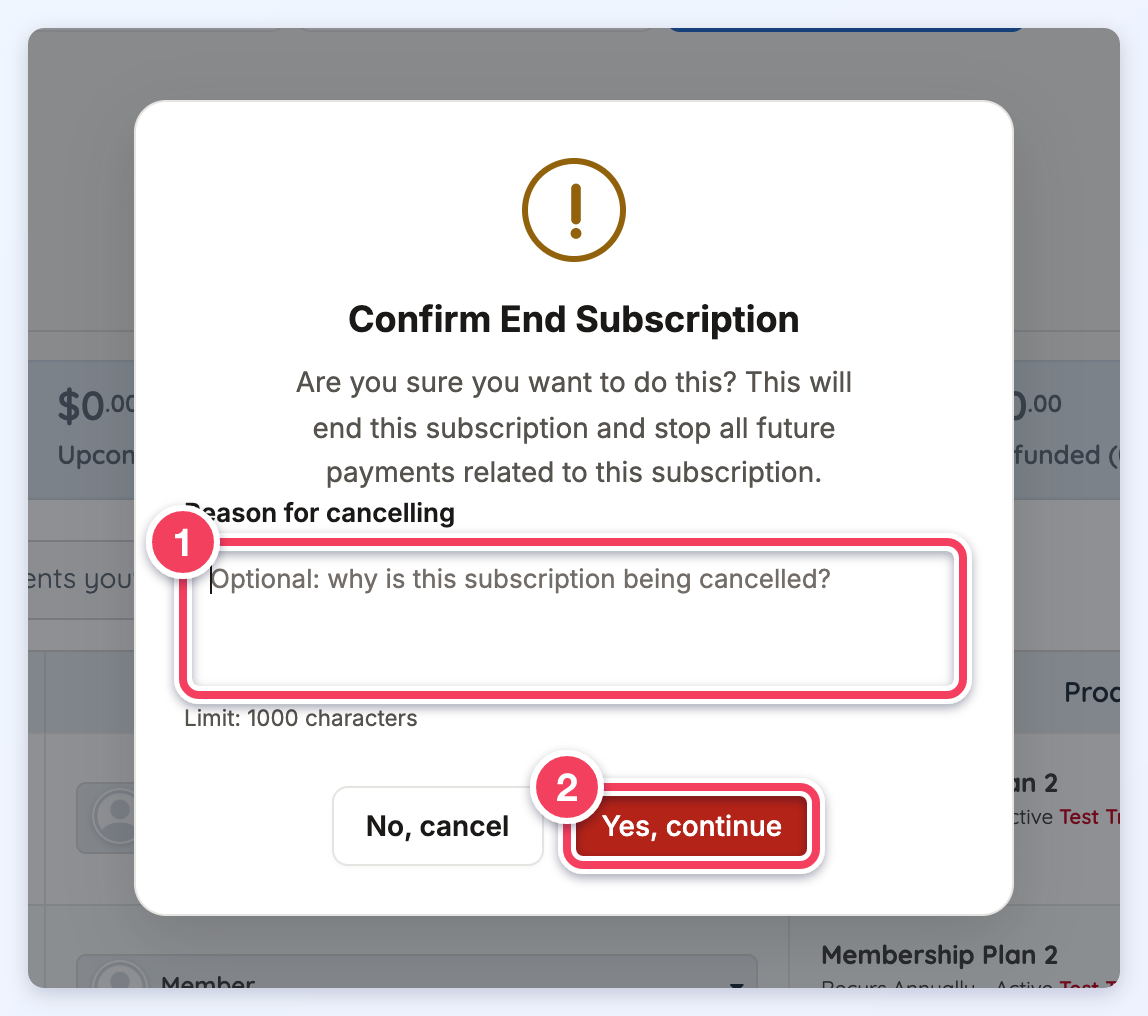
*Note: The End Subscription button will only appear when the invoice has an active subscription associated with it. - Delete This Invoice: Delete the invoice completely from the system. This is permanent and cannot be undone.
- Delete Subscription: Delete the subscription completely from the system. This will not delete any invoices related to the subscription but will delete the subscription itself from the system and will not collect any new invoices related to the subscription. This is permanent and cannot be undone. It is better to choose End Subscription in most cases unless there is a specific need to delete the subscription from the system entirely.
Upcoming Payments
The Upcoming Payments tab displays all payments scheduled for processing within the next 14 days, making it easier to track upcoming dues and contact members if needed. Above the tab name, the total amount of upcoming payments is also shown for quick reference.
In this section, the Due Date column is organized in ascending order rather than descending. Key details such as Invoice ID, status, date paid, member’s name, product (membership plan), and amount due are displayed.
Quick Actions
The Actions button (1) in the far-right column opens several options for the invoice (2).
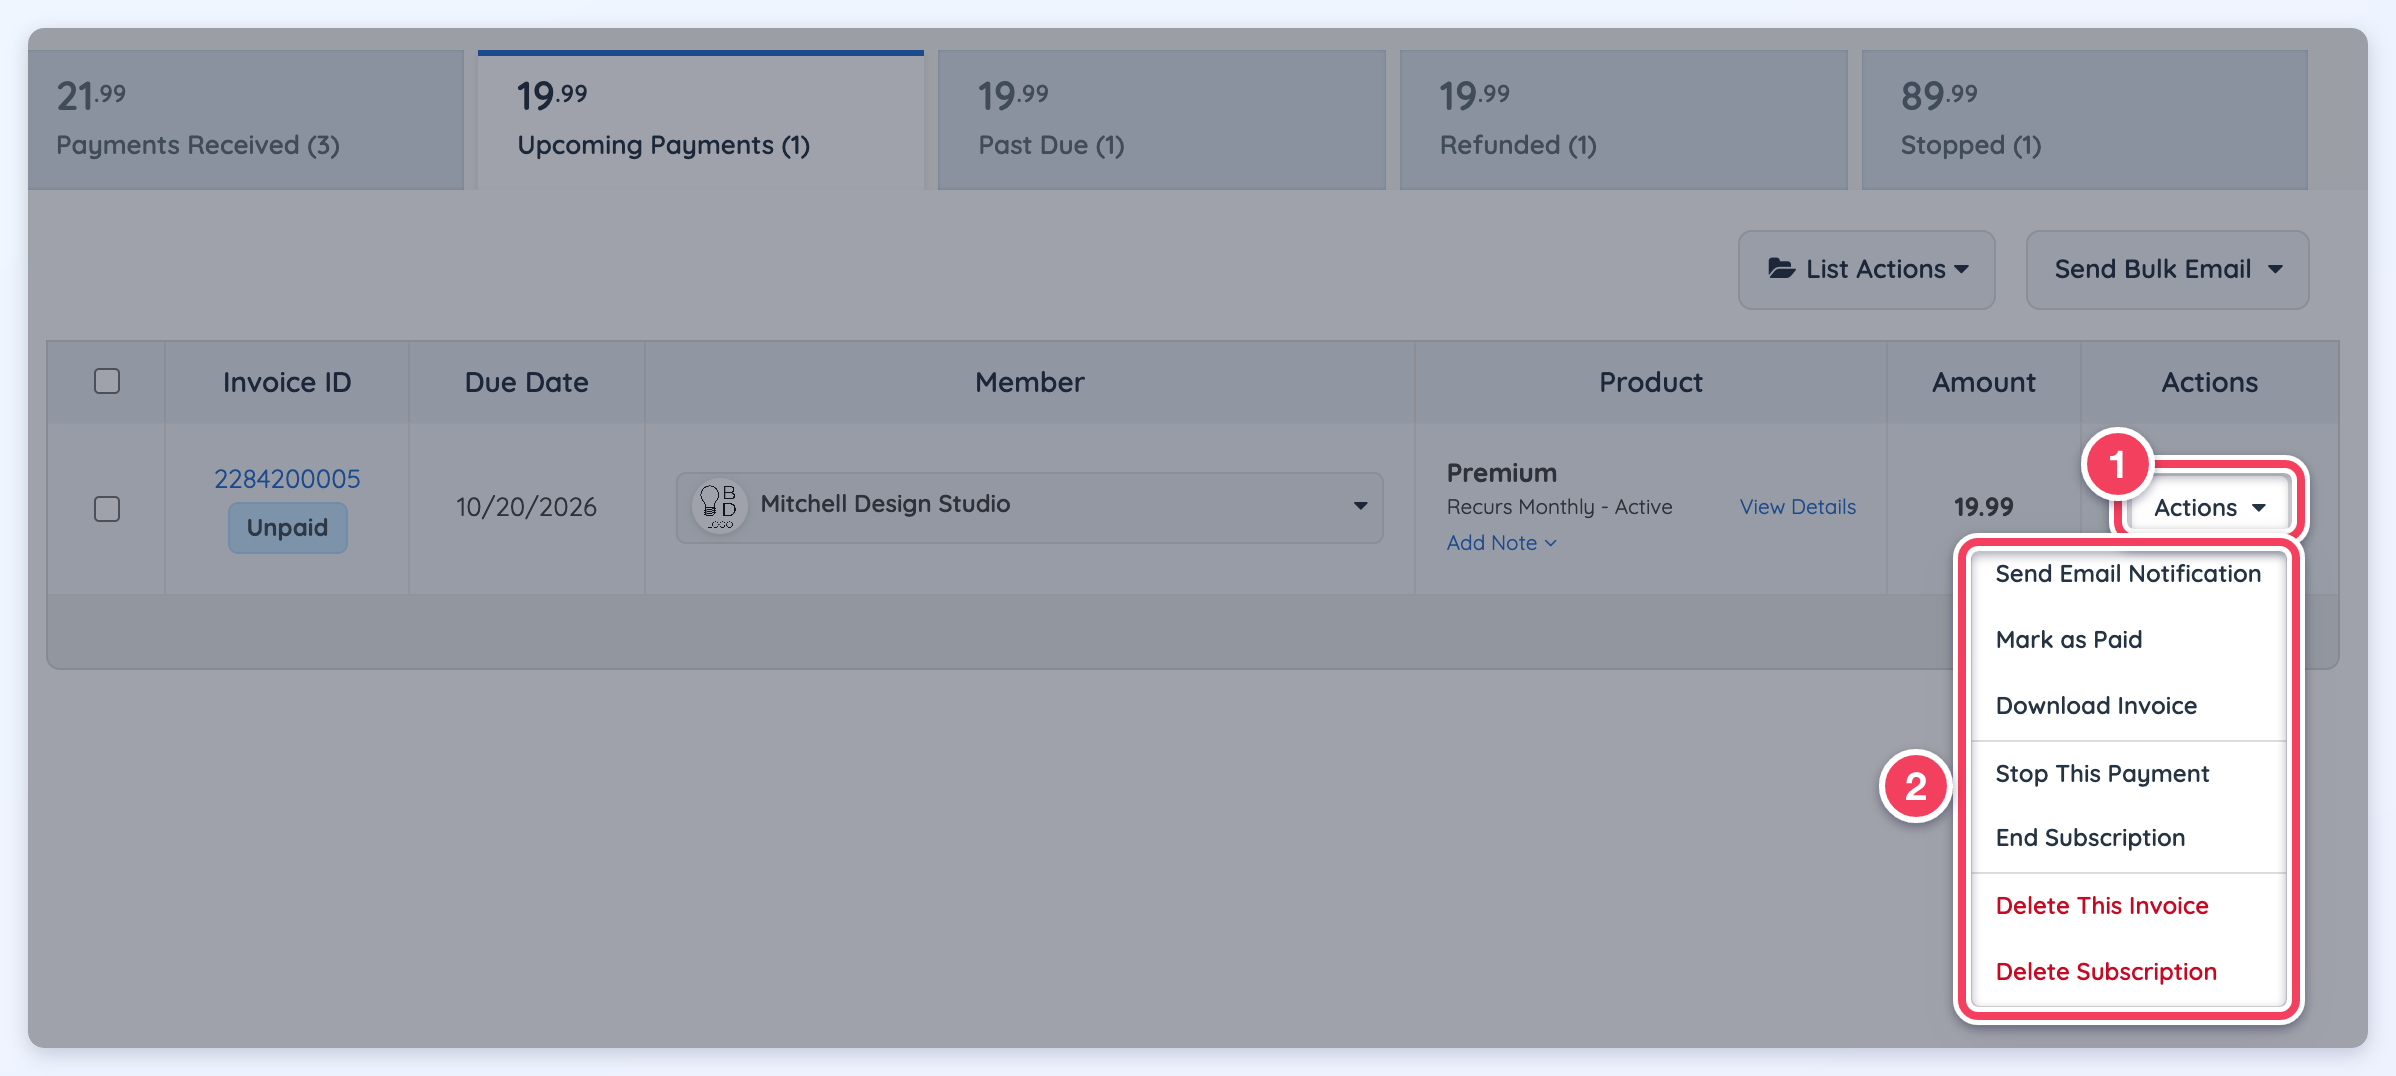
- Send Email Notification: Click this button to send an email notification to the member. Clicking this button will display the Compose Email pop-up and the system will automatically use the invoice_reminder_notice_first template when clicking this button under the Upcoming Payments tab.
- Mark as Paid: It allows marking this specific member as Paid. This is used for members who pay directly by bank deposit or with other payment methods that are not the default payment gateway. This way there is a record on the site. It allows changing the status of the payment from Unpaid to Paid, if this button is used, the system will move this payment to the Payments Received tab.
- Download Invoice: The admin can download the invoice for this specific payment. Keep in mind that in the member's dashboard, they can also download invoices.
- Stop This Payment: As this payment is going to be taken in the next 14 days, it can be stopped if needed. Using this option, the subscription (order) is not going to be cancelled, it will only cancel this specific payment.
- End Subscription: Use this button to stop (Cancel) the subscription related to that specific payment. If there are unpaid invoices, the system will cancel them as well. Clicking it opens the Confirm End Subscription window, which has an optional Reason for cancelling box (up to 1,000 characters). A reason entered there is saved with the cancellation and shown on the Finance » Search Subscriptions page. Full steps: How Do I Cancel Payment Subscriptions - Orders.
*Remember that the system will create the unpaid invoice 13 days before the next due date. Also, the End Subscription button will only appear when the invoice has an active subscription associated with it. - Delete This Invoice: It will delete the invoice from the admin and member's account.
- Delete Subscription: This one deletes the subscription from the admin and member's account.
Past Due Tab
The Past Due tab displays all payments that the system was unable to process.
These payments remain visible until the day after their due date. For instance, if a payment is due on the 29th and the system fails to process it, it will appear in this section until the 30th. The total amount of past-due payments is also displayed above the tab name for quick reference.
In this section, key payment details such as Invoice ID, status, date paid, member’s name, product (membership level), and amount due are listed.
Quick Actions
An Actions button (1) on the right opens additional management options for the admin (2).
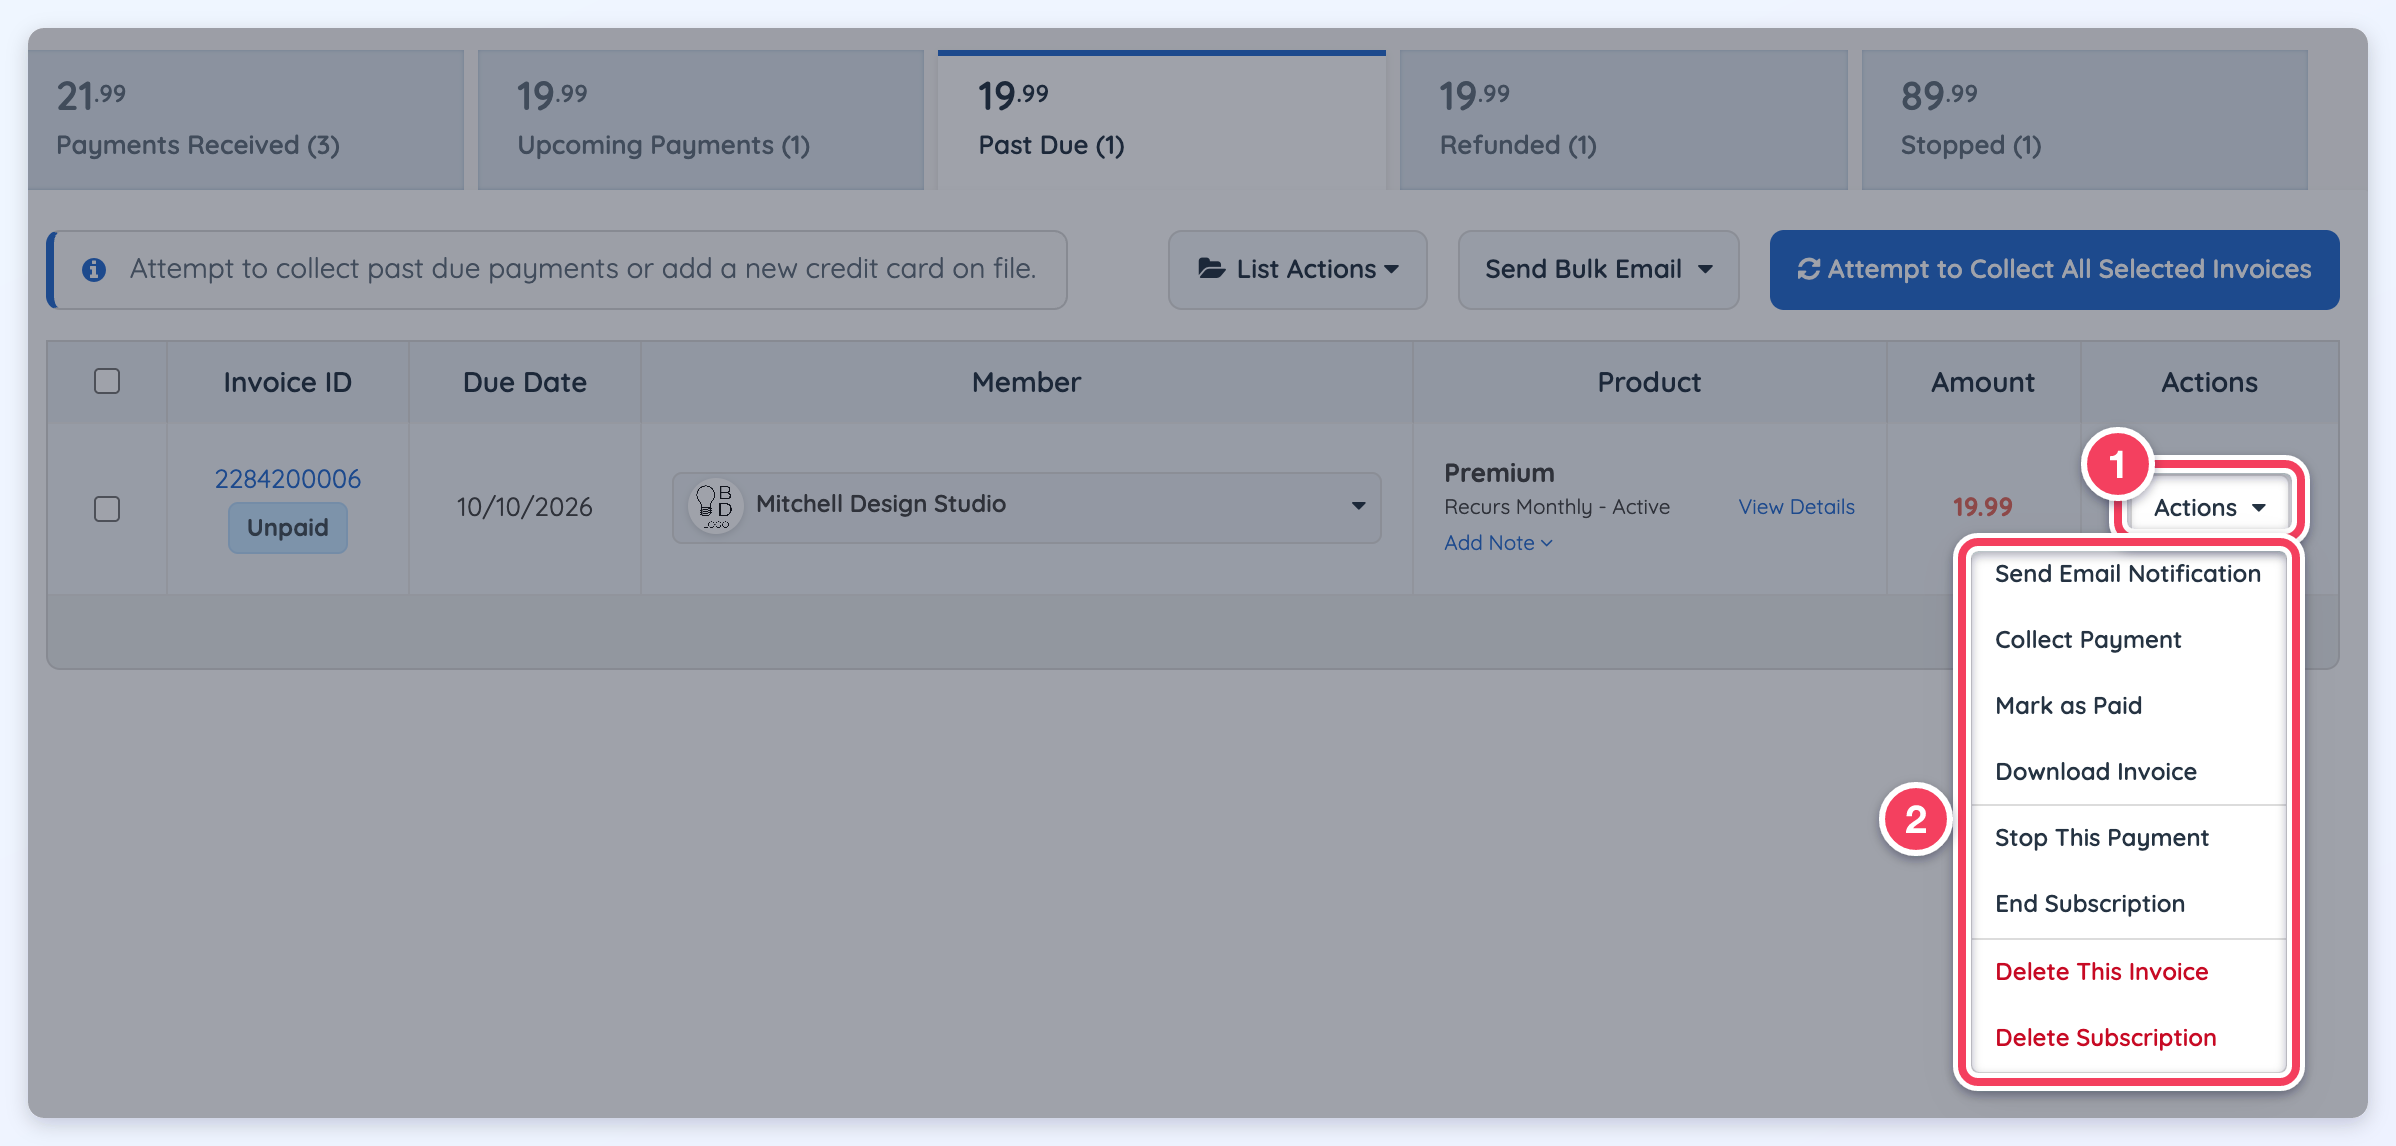
- Send Email Notification: Click this button to send an email notification to the member. Clicking this button will display the Compose Email pop-up and the system will automatically use the invoice_overdue_notice_first template when clicking this button under the Past Due tab.
- Collect Payment: Payment can be collected manually.
If the payment is taken successfully, it means that there are no issues with that card, but the money couldn't be taken because the bank declined the transaction on the first attempt, insufficient funds, etc. - Mark as Paid: It allows marking this specific member as Paid. This is used for members who pay directly by bank deposit or with other payment methods that are not the default payment gateway. This way, there is a record on the site. It allows changing the status of the payment from Unpaid to Paid. By using this button, the system will move this payment to the Payments Received tab.
- Download Invoice: Download a copy of this invoice in PDF format. Members can also download PDF copies of invoices through their Member Dashboard in the Billing History section.
- Stop This Payment: As this payment is going to be taken in the next 14 days, it can be stopped if needed. Using this option, the subscription (order) is not going to be cancelled, it will only cancel this specific payment.
- End Subscription: Use this button to stop (Cancel) the subscription related to this invoice. If there are unpaid invoices related to the subscription, the system will cancel them as well. Clicking it opens the Confirm End Subscription window, which has an optional Reason for cancelling box (up to 1,000 characters). Full steps: How Do I Cancel Payment Subscriptions - Orders.
- Delete This Invoice: It will delete the invoice from the admin and member's account.
- Delete Subscription: This one deletes the subscription from the admin and member's account.
Bulk Manual Invoice Collection
Since the billing system attempts to process each payment only once, unsuccessful transactions require manual follow-up. Payments can be collected manually, and members can update their credit card information if needed.
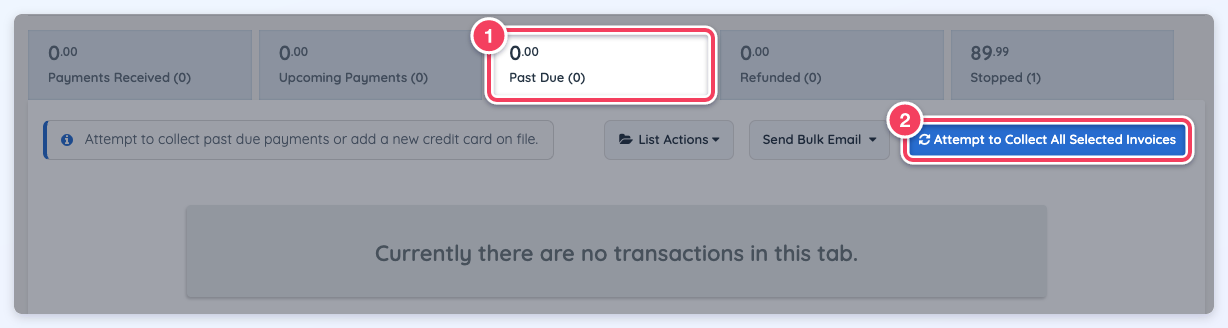
There is a button at the top right that attempts to collect all selected invoices. On the Past Due tab (1), tick the checkbox next to each invoice to collect, then click Attempt to Collect All Selected Invoices (2).
Updating Account Status
If the status of a member is Active, but it needs to be changed manually to Past Due, the system will show this error (1) and the change is not saved:
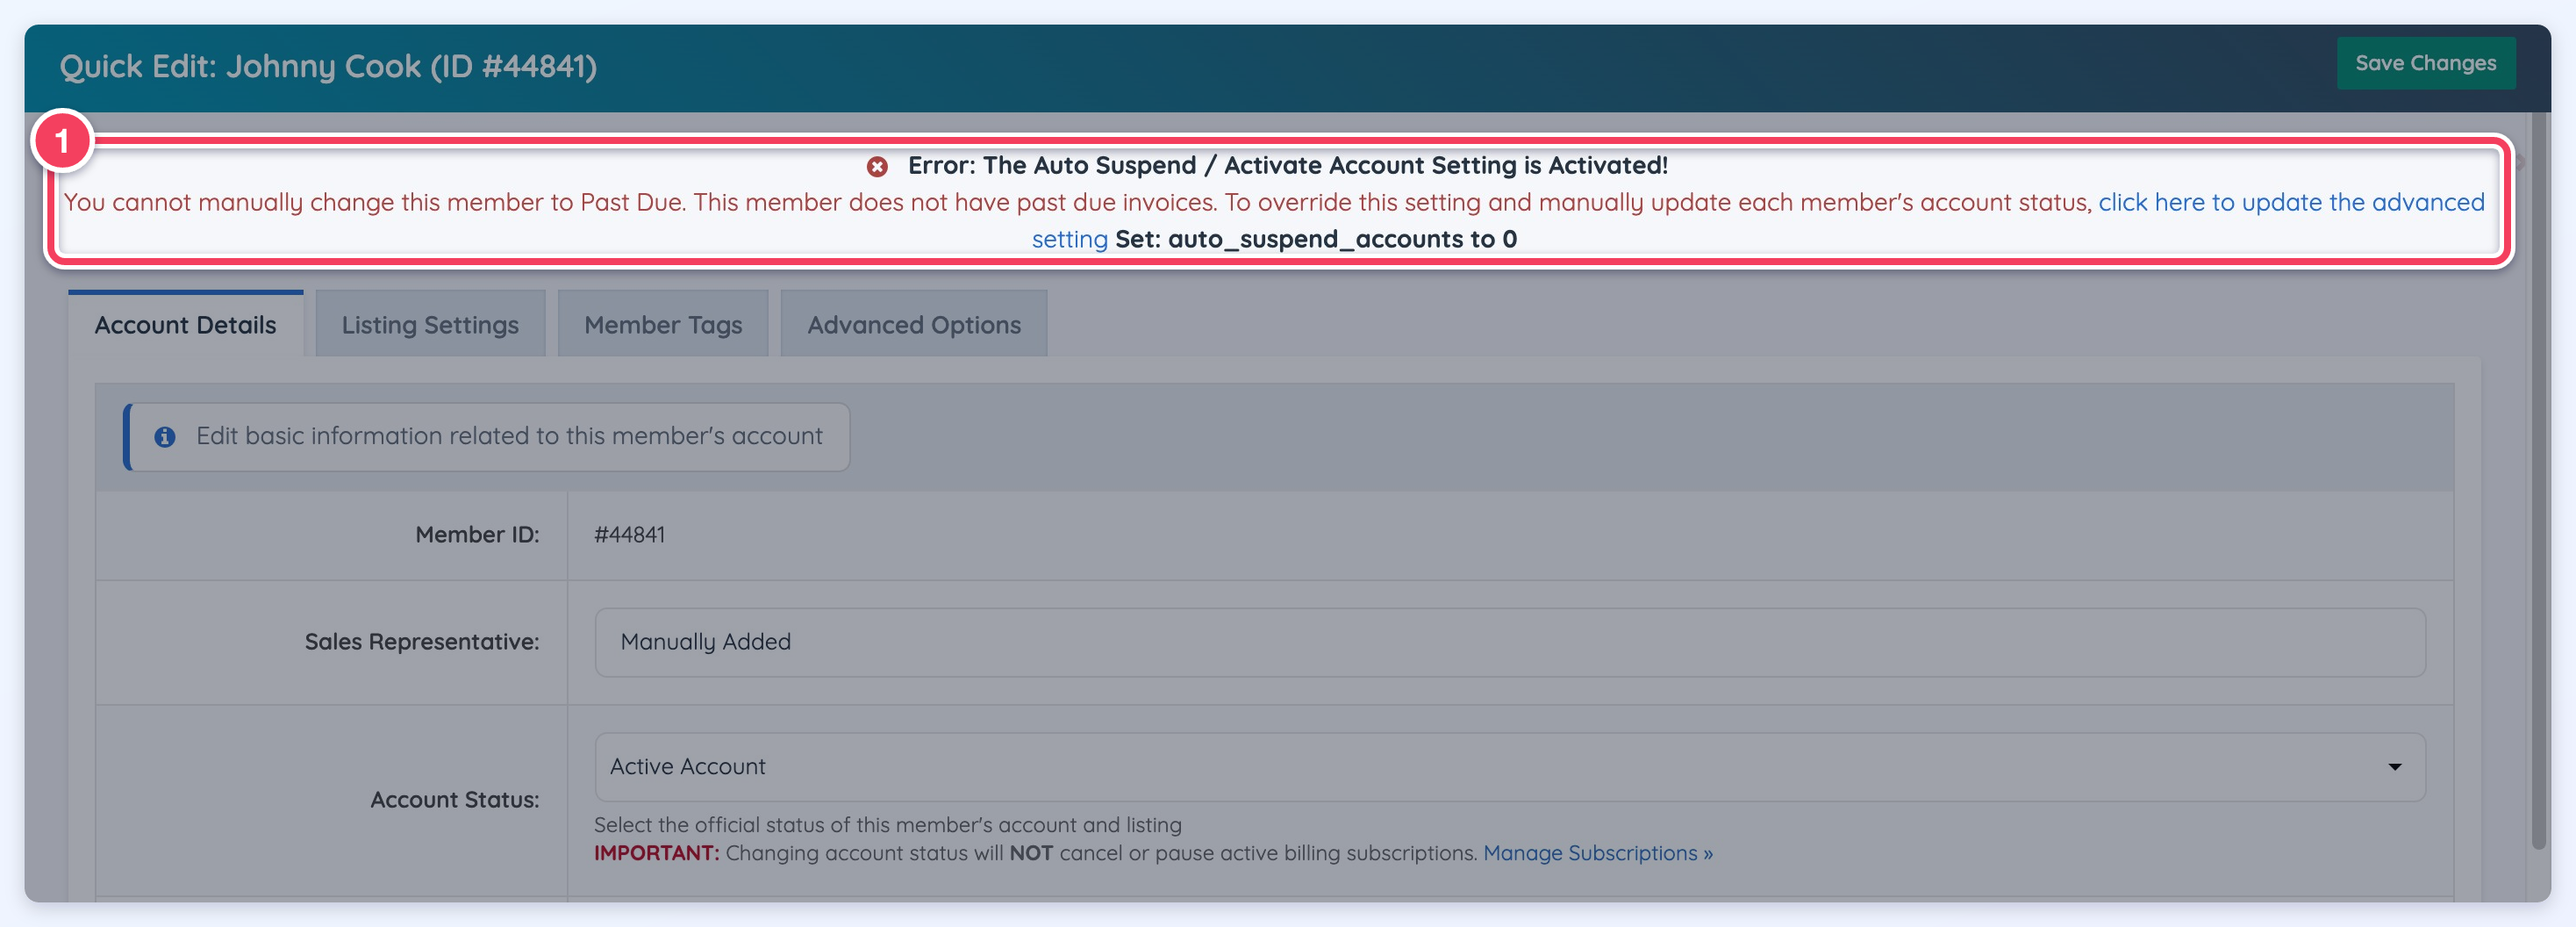
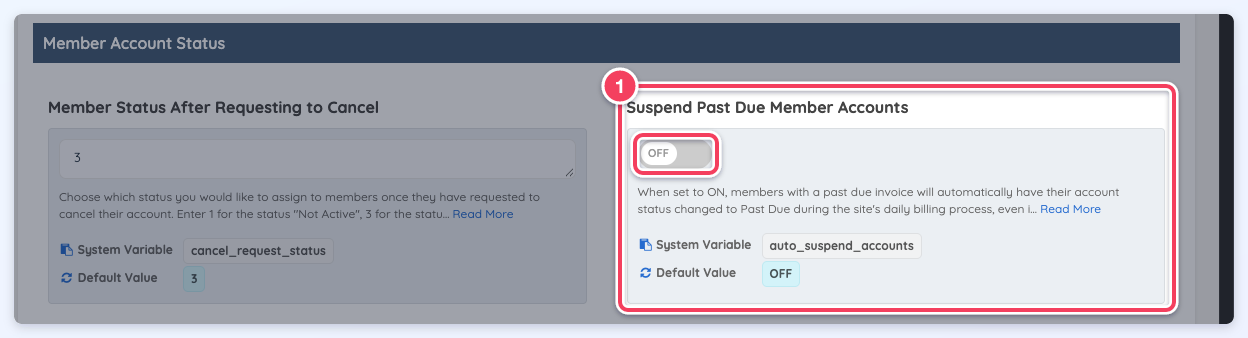
This error only appears while the advanced setting Suspend Past Due Member Accounts is ON. With it ON, the status cannot be changed from Active to Past Due unless the member has at least one past-due invoice. The setting is OFF by default.
To override this setting and manually update each member's account status, the advanced setting Suspend Past Due Member Accounts needs to be set to OFF. It is on the Sign Ups & Billing tab of Settings » Advanced Settings, under Member Account Status.
Refunded
The Refunded Payments section displays all successful payments that have been refunded. Above the tab name, the total amount of refunded payments is shown for easy reference.
This section includes key details such as the Invoice ID, status, date paid, member’s name, product (membership level), and amount refunded, allowing administrators to track and manage refunded transactions efficiently.
Quick Actions
An Actions button (1) on the right opens additional management options for the admin (2).
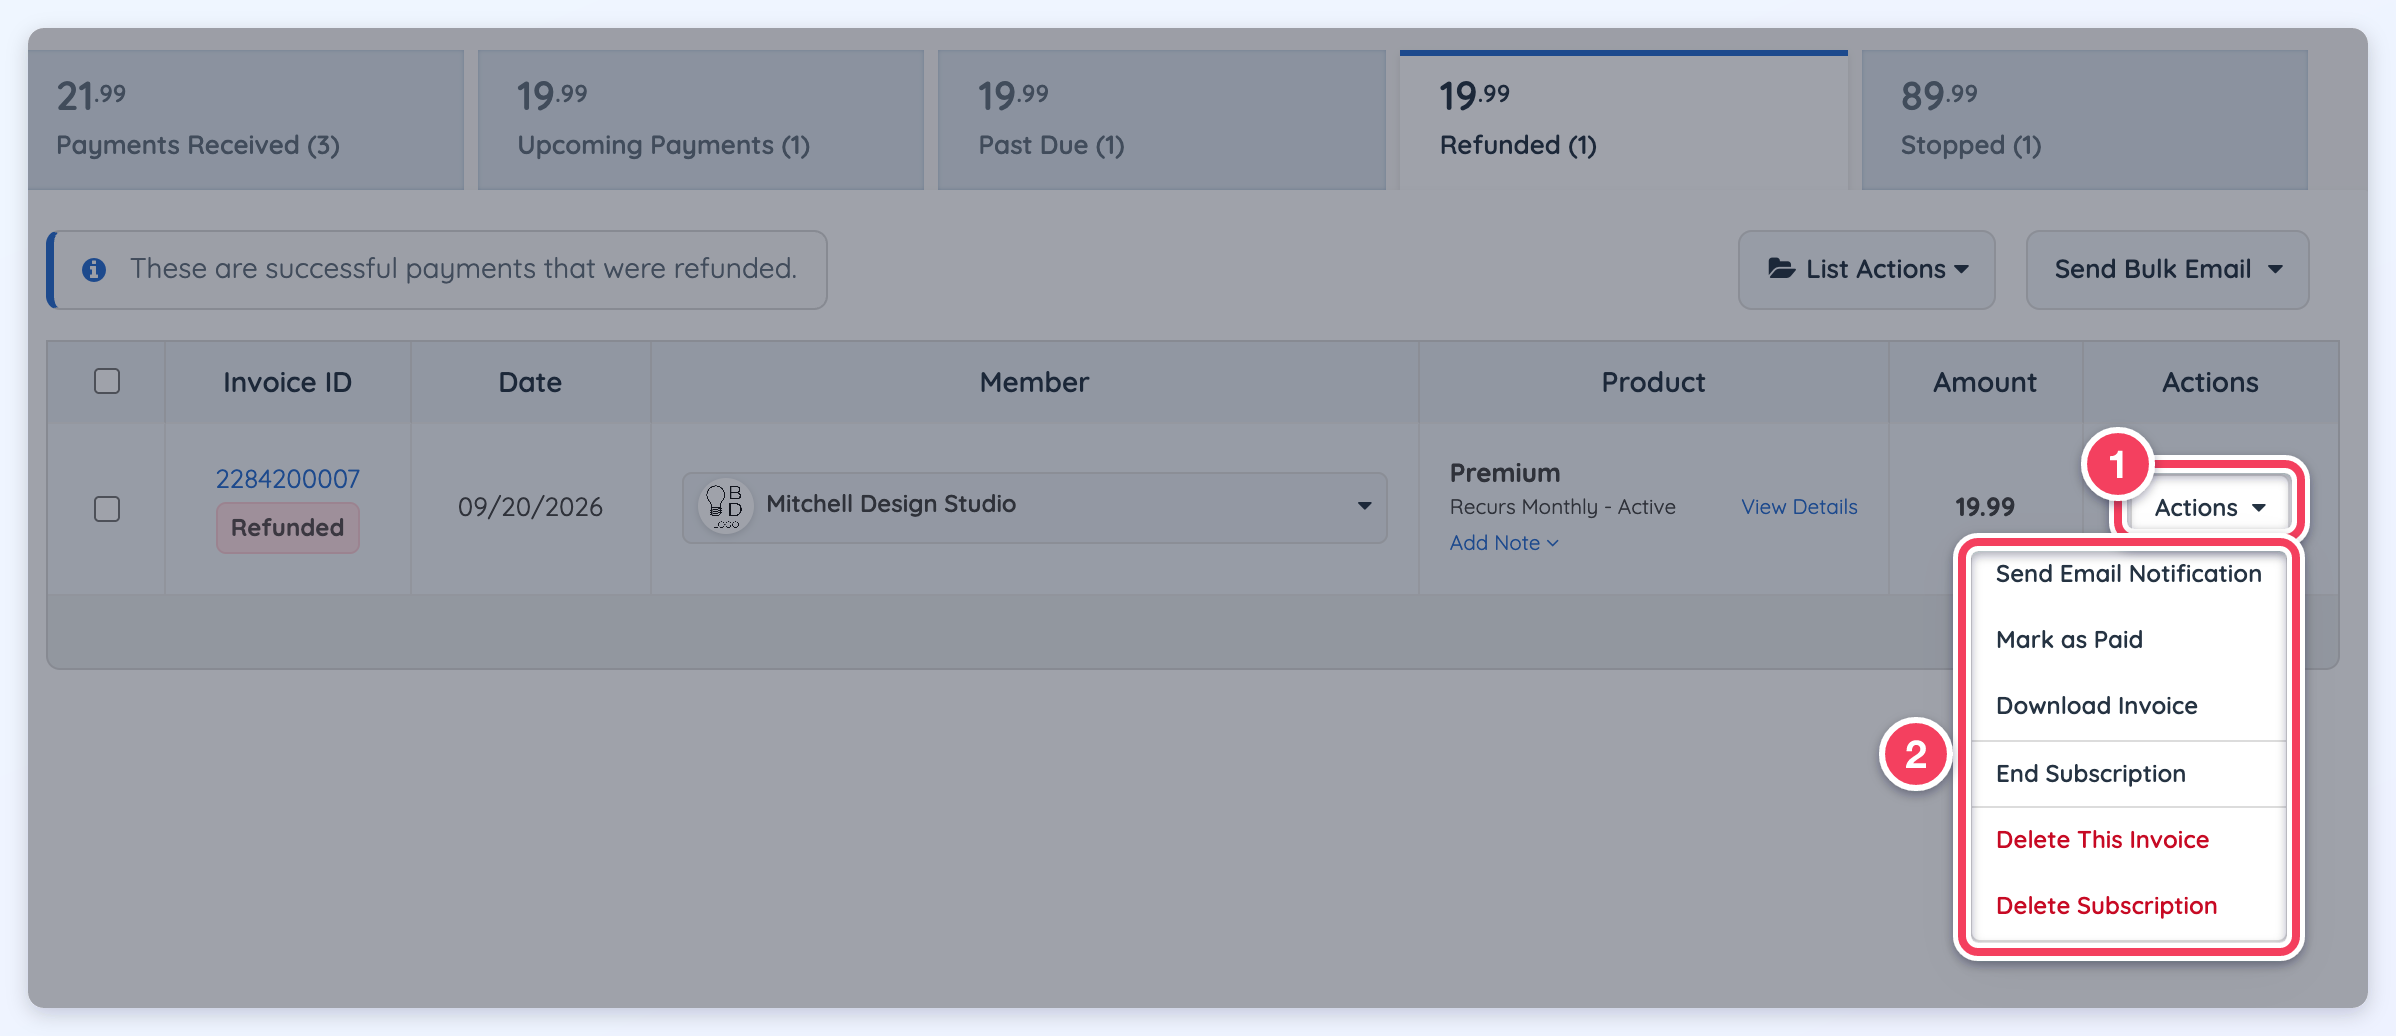
- Send Email Notification: Click on this button to send an email notification to the member.
Clicking on this button will display the Compose Email pop-up and the system will automatically use the invoice_refund_confirmation template. - Mark as Paid: It allows marking this specific member as Paid. This is used for members who pay directly by bank deposit or with other payment methods that are not the default payment gateway. This way, there is a record on the site. It allows changing the status of the payment from Unpaid to Paid, using this button the system will move this payment to the Payments Received tab.
- Download Invoice: Download a copy of this invoice in PDF format. Members can also download PDF copies of invoices through their Member Dashboard in the Billing History section.
- End Subscription: Use this button to stop (Cancel) the subscription related to this invoice. If there are unpaid invoices related to the subscription, the system will cancel them as well. Clicking it opens the Confirm End Subscription window, which has an optional Reason for cancelling box (up to 1,000 characters). Full steps: How Do I Cancel Payment Subscriptions - Orders.
- Delete This Invoice: It will delete the invoice from the admin and member's account.
- Delete Subscription: This one deletes the subscription from the admin and member's account.
Stopped
The Stopped Payments section displays payments that were scheduled for processing but were stopped and cancelled before completion. Above the tab name, the total amount of stopped payments is shown for easy reference.
This section includes important details such as the Invoice ID, status, date paid, member’s name, product (membership plan), and amount. Additionally, an Actions button on the right allows admins to manage these payments.
Quick Actions
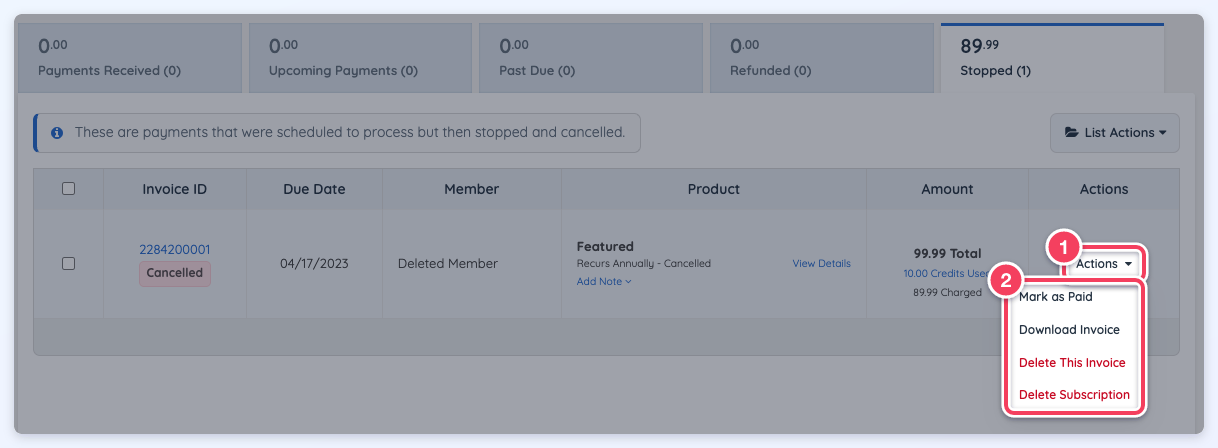
- Mark as Paid: This option allows marking this specific member as Paid. This is used for members who pay directly by bank deposit or with other payment methods that are not the default payment gateways. This way, there is a record on the site. It allows changing the status of the payment from Unpaid to Paid, using this button the system will move this payment to the Payments Received tab.
- Download Invoice: Download a copy of this invoice in PDF format. Members can also download PDF copies of invoices through their Member Dashboard in the Billing History section.
- End Subscription: Use this button to stop (Cancel) the subscription related to that specific payment. If there are unpaid invoices the system will cancel them as well. Clicking it opens the Confirm End Subscription window, which has an optional Reason for cancelling box (up to 1,000 characters). A reason entered there is saved with the cancellation and shown on the Finance » Search Subscriptions page. Full steps: How Do I Cancel Payment Subscriptions - Orders.
*Remember that the system will create the unpaid invoice 13 days before the next past due. Also, the End Subscription button will only appear when the invoice has an active subscription associated with it. - Delete This Invoice: It will delete the invoice from the admin and member's account.
- Delete Subscription: This one deletes the subscription from the admin and member's account.
Delete Several Stopped Invoices at Once
The Stopped tab also has a checkbox next to each invoice and a select-all checkbox in the table header. To delete several stopped invoices in one step, select them and click List Actions » Delete Selected. The steps are explained in Delete Several Stopped Invoices at Once below.
Member Information
In all of the tabs, hovering over the member's name (1) will display information about the member along with several links to take actions on the member (2):
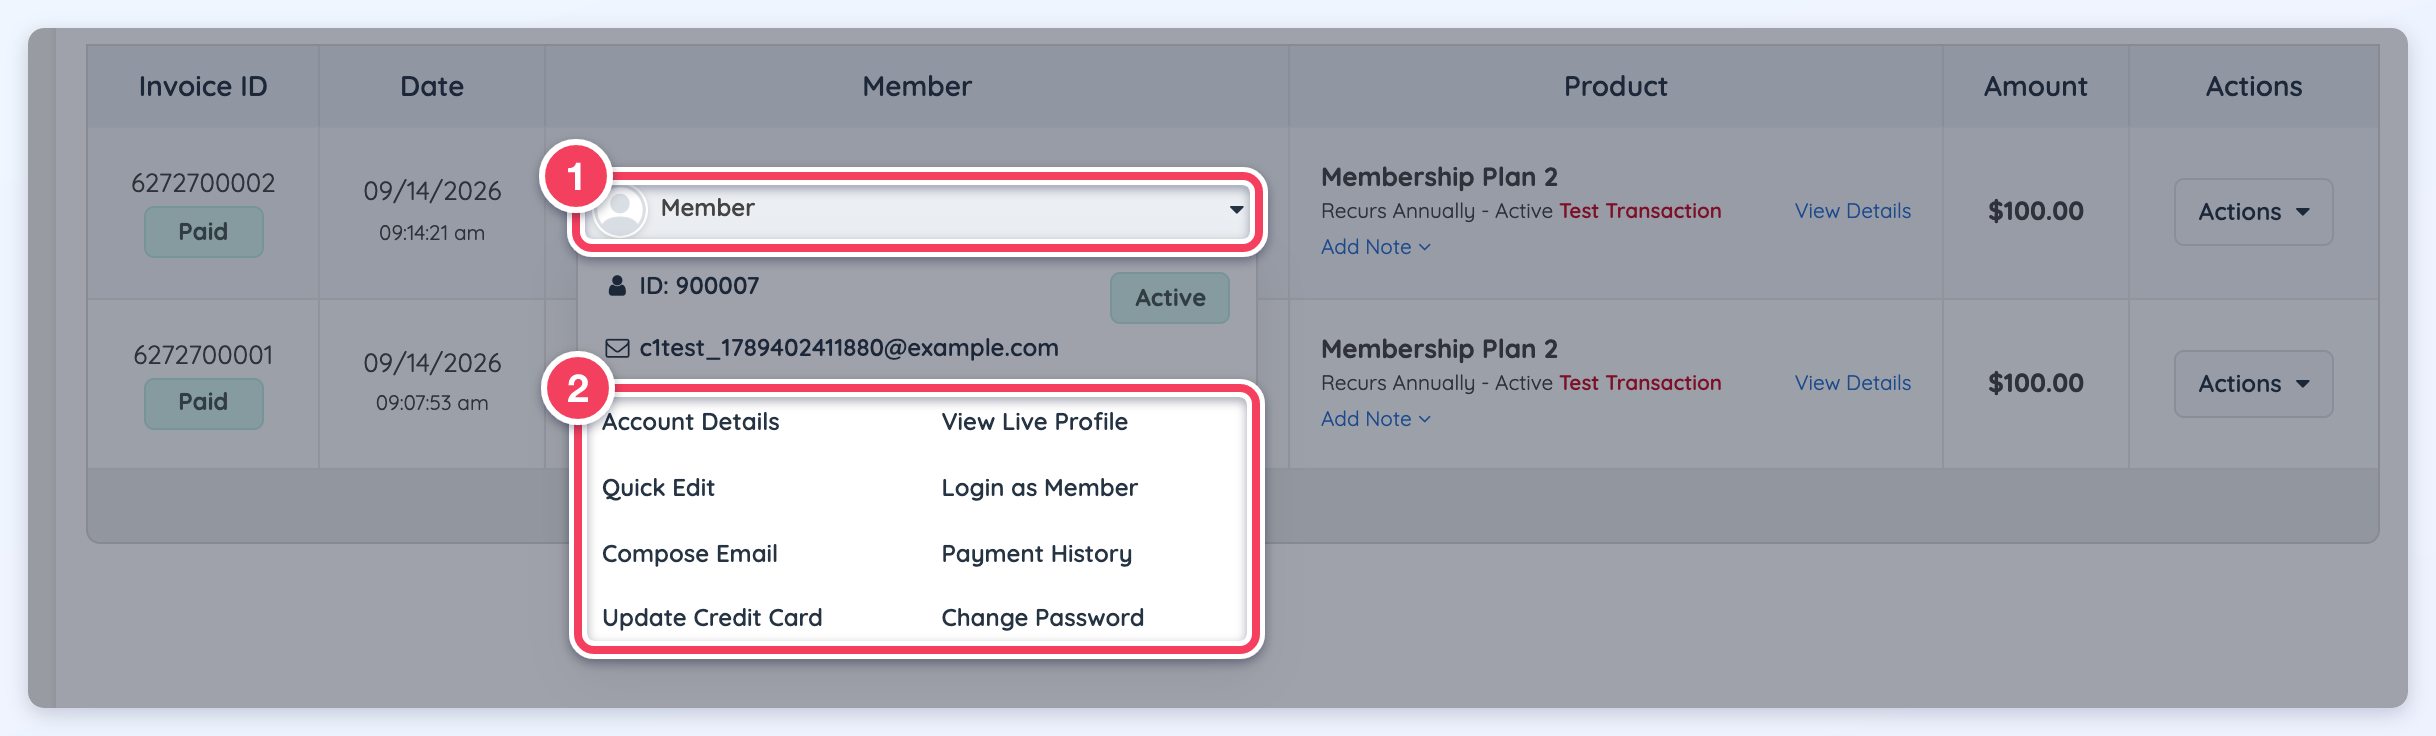
- Account Details: Links to the member's Account Details page, which contains an overview of information about the specific member.
- Quick Edit: Edit several attributes of the member without logging into their account.
- Send Email: Send an email to the member. Use an existing email template or send a custom email.
- Change Password: Assign a new password for the member.
- View Live Profile: View the live profile of the member as seen by visitors to the website.
- Login as Member: Login to the member's dashboard as if they logged in to their account.
- Payment History: See the complete billing history of this member.
- Delete Account: Delete the member's account completely.
Billing Email Settings
To configure the billing email settings, read this article: Billing Reminder Email Settings
Income Reports
At the top right is the "Income Reports" button, which has 3 options:
- Daily Income Report
- Monthly Income Report
- Recurring Income Estimator
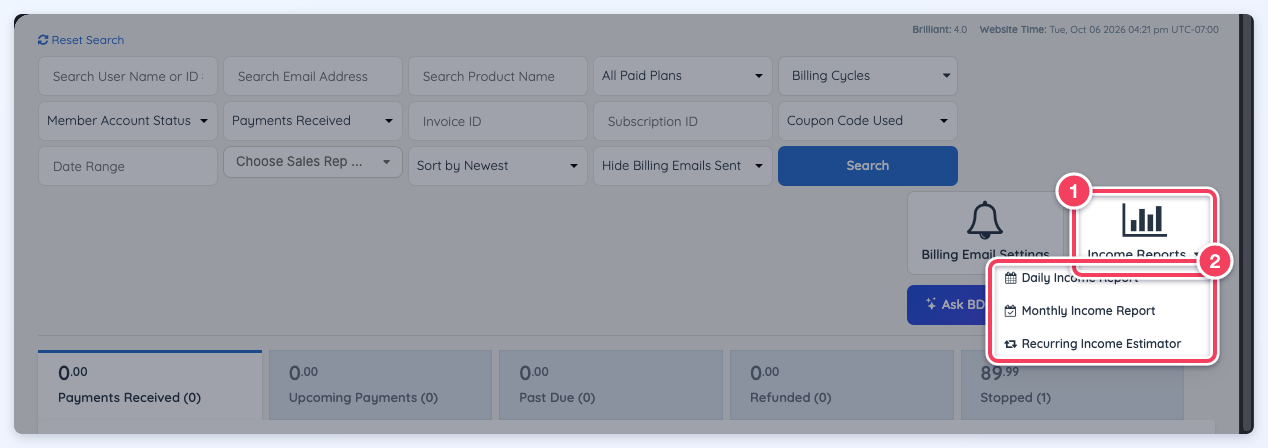
These reports cannot be downloaded. However, the tables can be selected and copied, then the information can be pasted into an Excel sheet.
Report Details
These reports are an estimate and exact totals may slightly differ based on the timestamp and timezone defined by the payment gateway.
This report is generated in the time chosen in the General Settings >> Location Tab >> Hour of Day to Collect Recurring Payments: Settings » General Settings » Localization.
Ask BD Butler Section - Revenue Insights & More
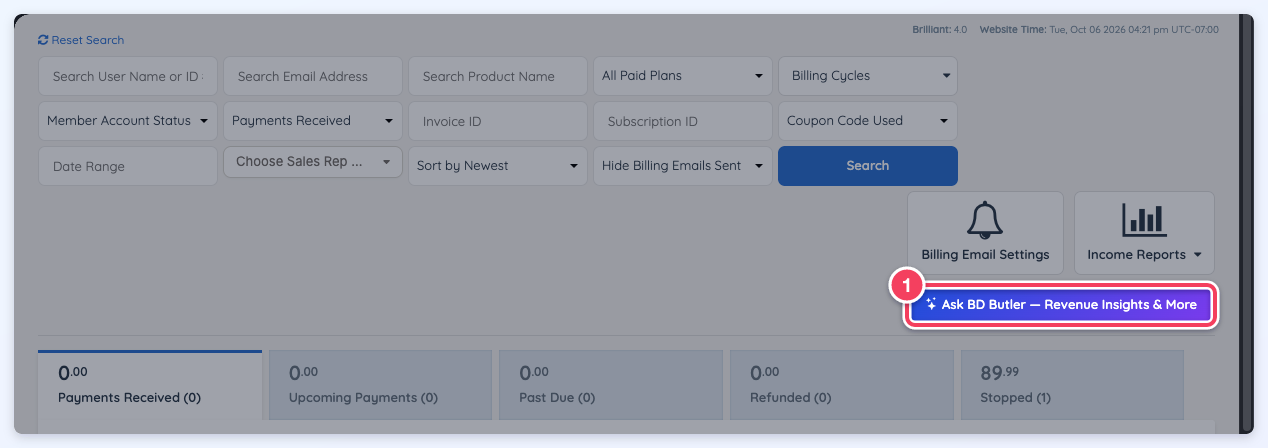
The BD AI assistant is designed to analyze website financial data and provide quick answers regarding revenue, payments, subscriptions, and general website transaction history. Here's an article with more information about this: BD Butler.
Transaction Search Filter Options
The Transaction History includes 14 search filter options:
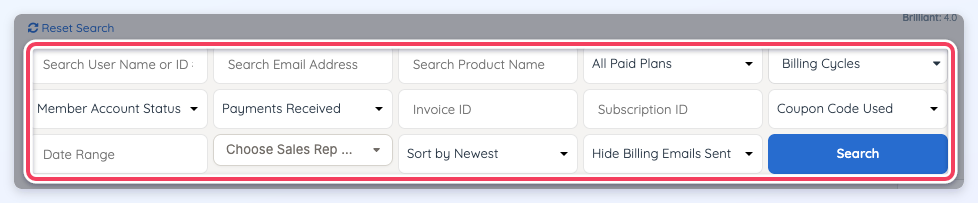
- Member name or ID#
- Member email address
- Product Name (for example; name of the membership plan or digital product purchased)
- Membership plan name
- Billing cycles
- Member Account Status
- Invoice Status
- Invoice ID#
- Subscription ID#
- Coupon Code name
- Invoice Date Range
- Sales Rep Name
- Sort by Newest or Oldest option
- Option Show or Hide Billing Emails Sent
Billing Cycles
When searching by Billing Cycles, the admin can select more than one option here:
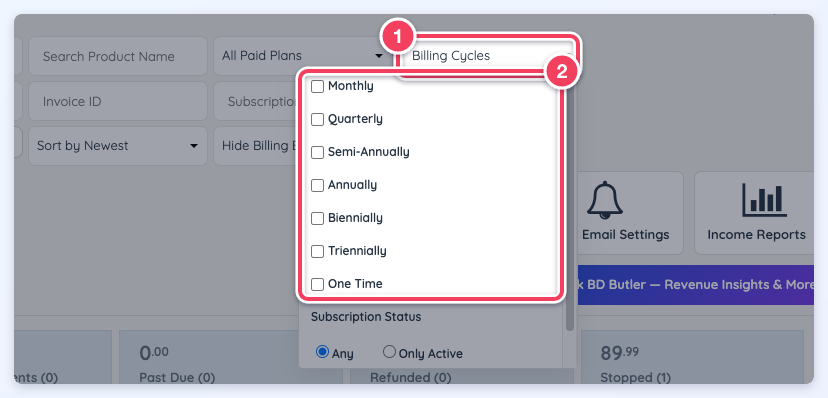
Within the Billing Cycles drop-down, there are also options to sort by three subscription statuses:
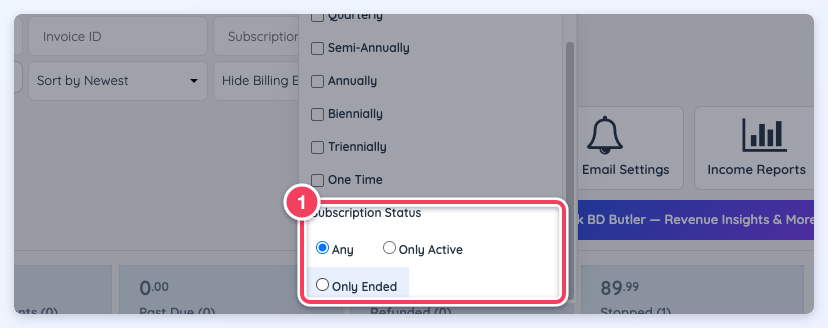
- Any - This will display the invoices for members that have active and ended (cancelled) subscriptions.
- Only Active - This will display the invoices for members that have an active subscription.
- Only Ended - This will display the invoices for members that have an ended (cancelled) subscription
Sales Rep
The Sales Rep Name option will only display if the settings are enabled. Here's an article with more details about How to Activate Sales Representative Tracking For Members.
List Actions Dropdown
In this section, called "List Actions", it is possible to export data, create smart lists, and delete invoices in bulk to help organize and manage information efficiently.
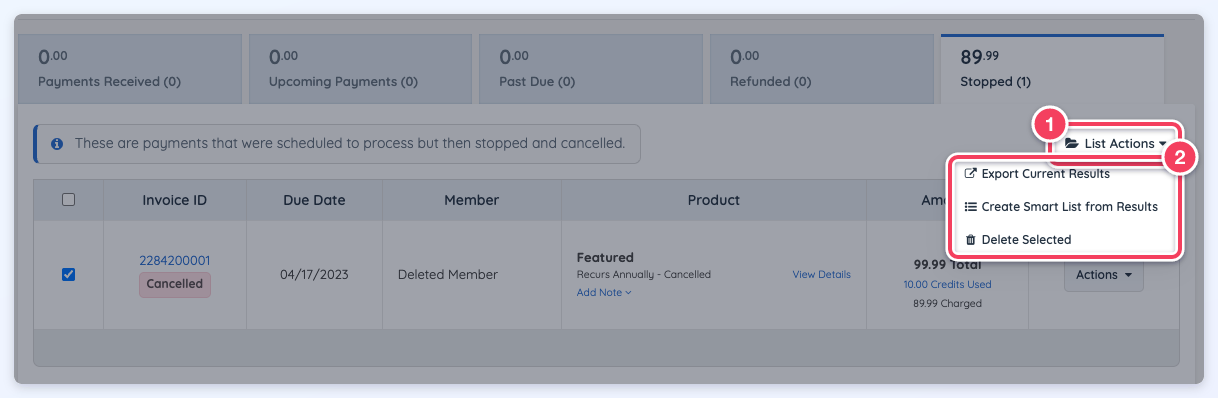
Export Transactions
Under this dropdown, it is possible to export the currently selected results by clicking on Export Current Results.
Clicking this opens the Export Transactions window. Tick the fields to export under Available Export Fields (1); the chosen fields are listed under Selected Fields (2). Then click Continue with Export (3), or Cancel Export to close the window without exporting:
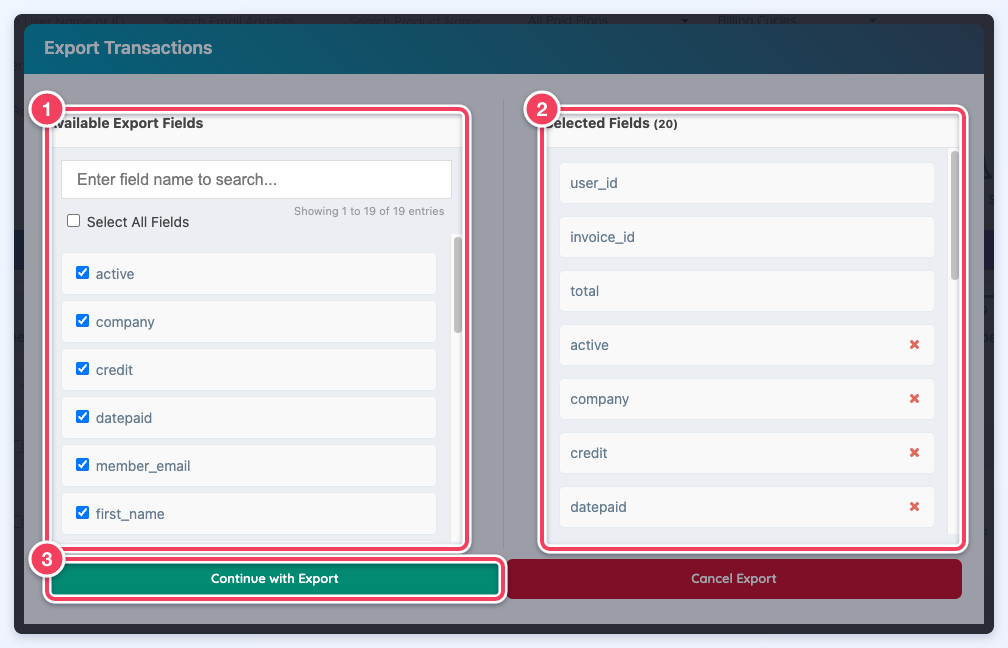
Available Transaction History Export Fields
|
|
For this action to appear, the Export Member Data add-on has to be enabled on the site.
Transactions History Smart List
It is also possible to create a Smart List of the currently selected results by clicking Create Smart List from Results. Clicking this will display a pop-up where the name of the smart list can be entered (1):
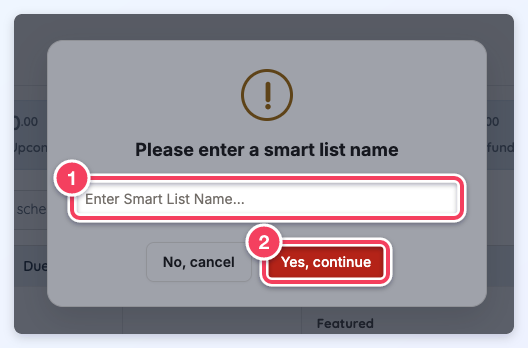
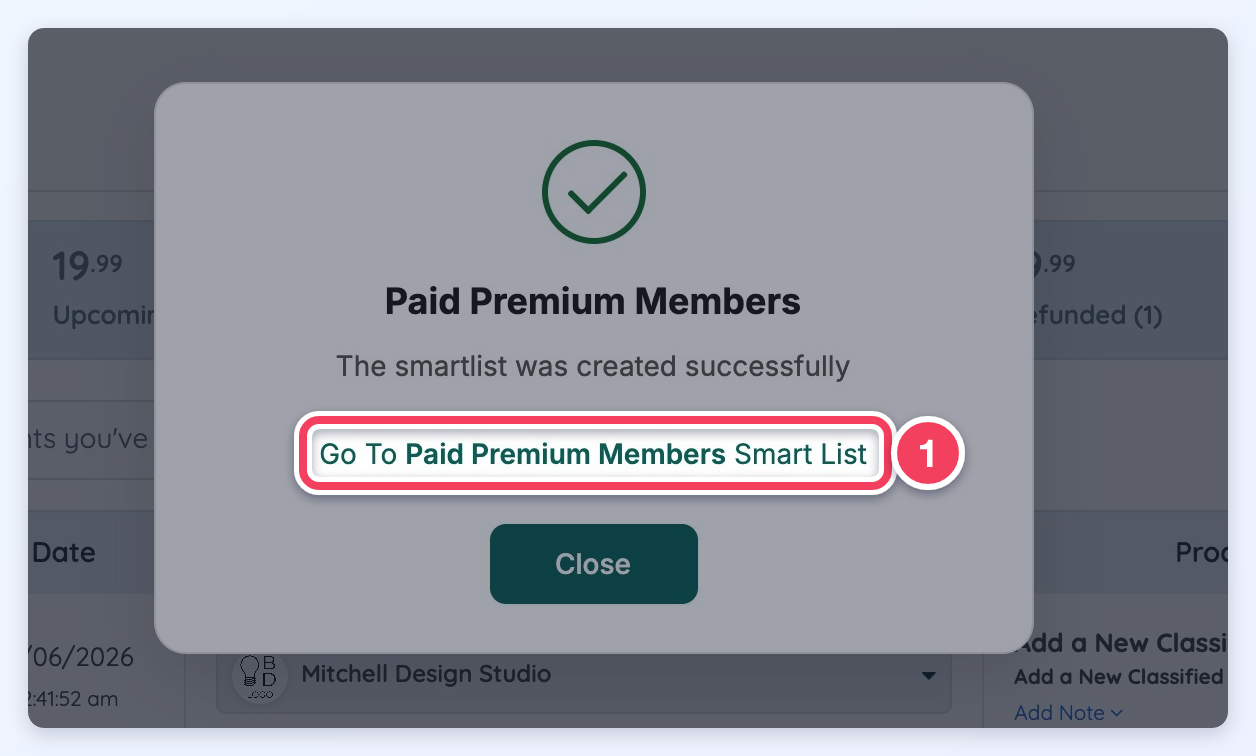
The smart list will be created after clicking Yes, continue (2). A confirmation window then shows the smart list name. To open the new smart list right away, click the Go To <name of the smart list> Smart List link (1):
Delete Selected
Invoices can be deleted in bulk from the tabs that show a checkbox next to each invoice: Past Due, Refunded and Stopped, plus Payments Received and Upcoming Payments when the Billing Reminder Emails add-on is enabled. Deleted invoices cannot be recovered.
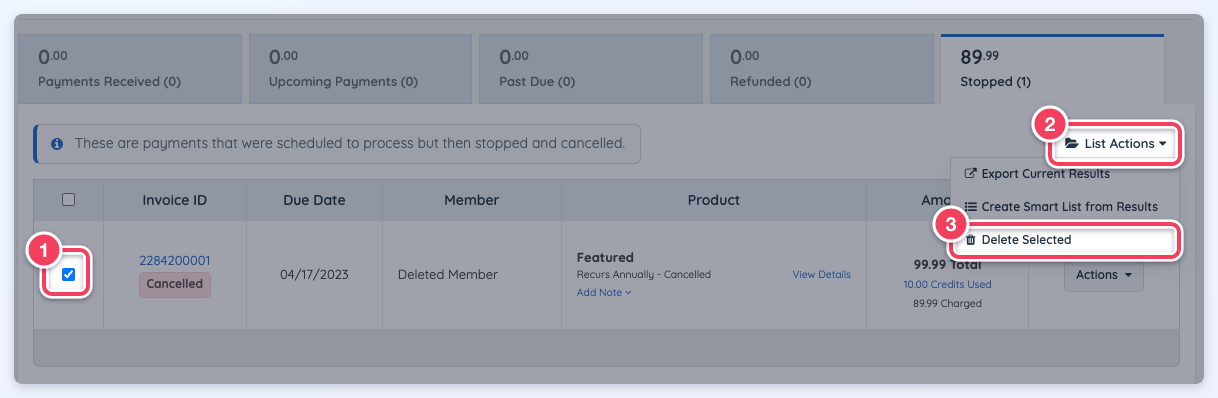
- Tick the checkbox next to each invoice to delete (1). The checkbox in the table header selects every invoice currently loaded on the page (results load 20 at a time).
- Click List Actions (2), then click Delete Selected (3). If no invoice is selected, the message "No Invoices Selected" appears.
- In the Confirm Bulk Delete window, choose one of the two options:
- Yes, delete invoices and subscriptions: deletes the selected invoices and the subscriptions they belong to. A subscription that still has other active invoices is kept, the same as when a single invoice is deleted.
- No, only delete invoices: deletes only the selected invoices and leaves every subscription untouched.
- Both options lead to a final Are you sure? window. Click Yes, continue to delete, or No, cancel to stop without deleting anything.
When the deletion finishes, the message "Deleted! X invoice(s) deleted successfully." appears and the list reloads. If some invoices could not be deleted, the message reads "Done X of N invoice(s) deleted. Y could not be deleted." and the invoices that were not deleted remain in the list.
Send Bulk Email Dropdown
If the site has the "Billing Reminder Emails" Add-On, the option to send out certain bulk payment emails appears for 3 tabs:
- Payments Received
- Upcoming Payments
- Past Due
Click here to review the emails sent out: Billing Reminder Email Templates

Transaction Notes
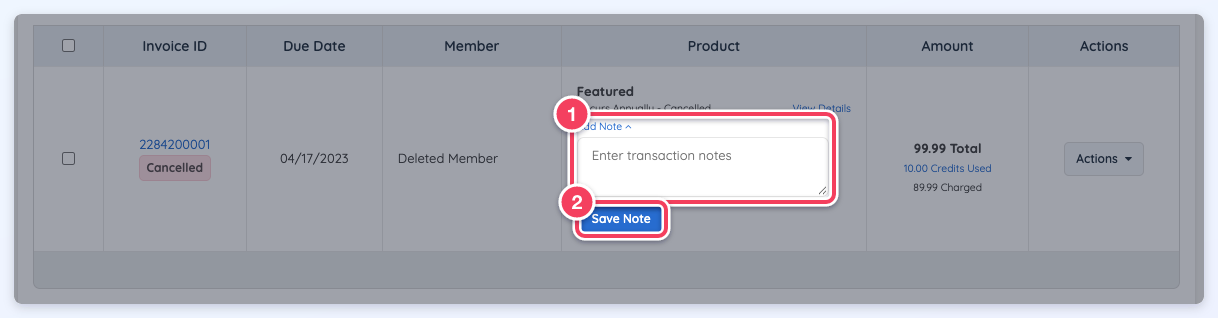
Admins have the ability to add notes to all invoice types, including Received, Upcoming, Past Due, Refunded, and Stopped invoices.
Admins can also leave notes when they attempt to contact a member, which helps with tracking billing more efficiently. Click Add Note under the product name, type the note (1) and click Save Note (2).
Additional Information Shown
The transaction history results will also display additional information depending on the member purchase.
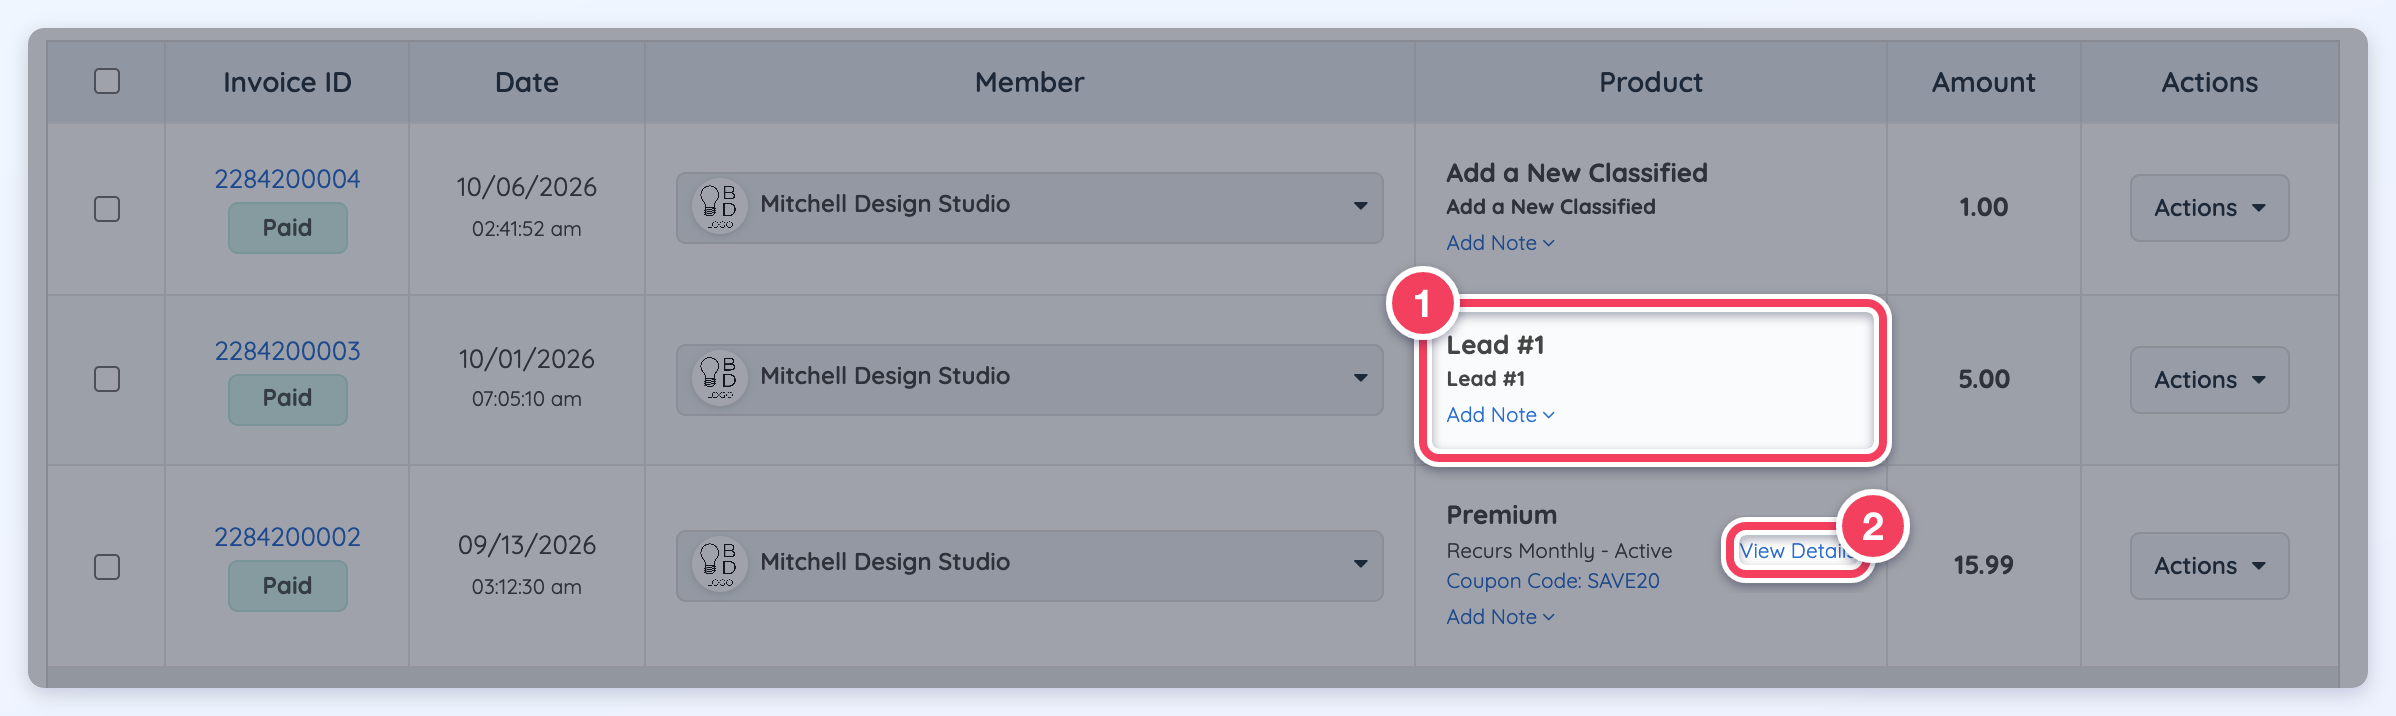
Leads
If the member purchased a lead, the row shows the lead number (1) and no View Details link. View Details (2) only appears when the payment belongs to a subscription.
Pay-Per-Post Purchased Limit
If the Vip Add-Ons were installed on the site and a member paid per post, the payment information will appear in the Payments Received tab as "Add a New Name of the Post Type" (1). The "Add a New" wording comes from the purchase_limit_for text label. In the screenshot below the member paid for a Classified.

Coupon Codes
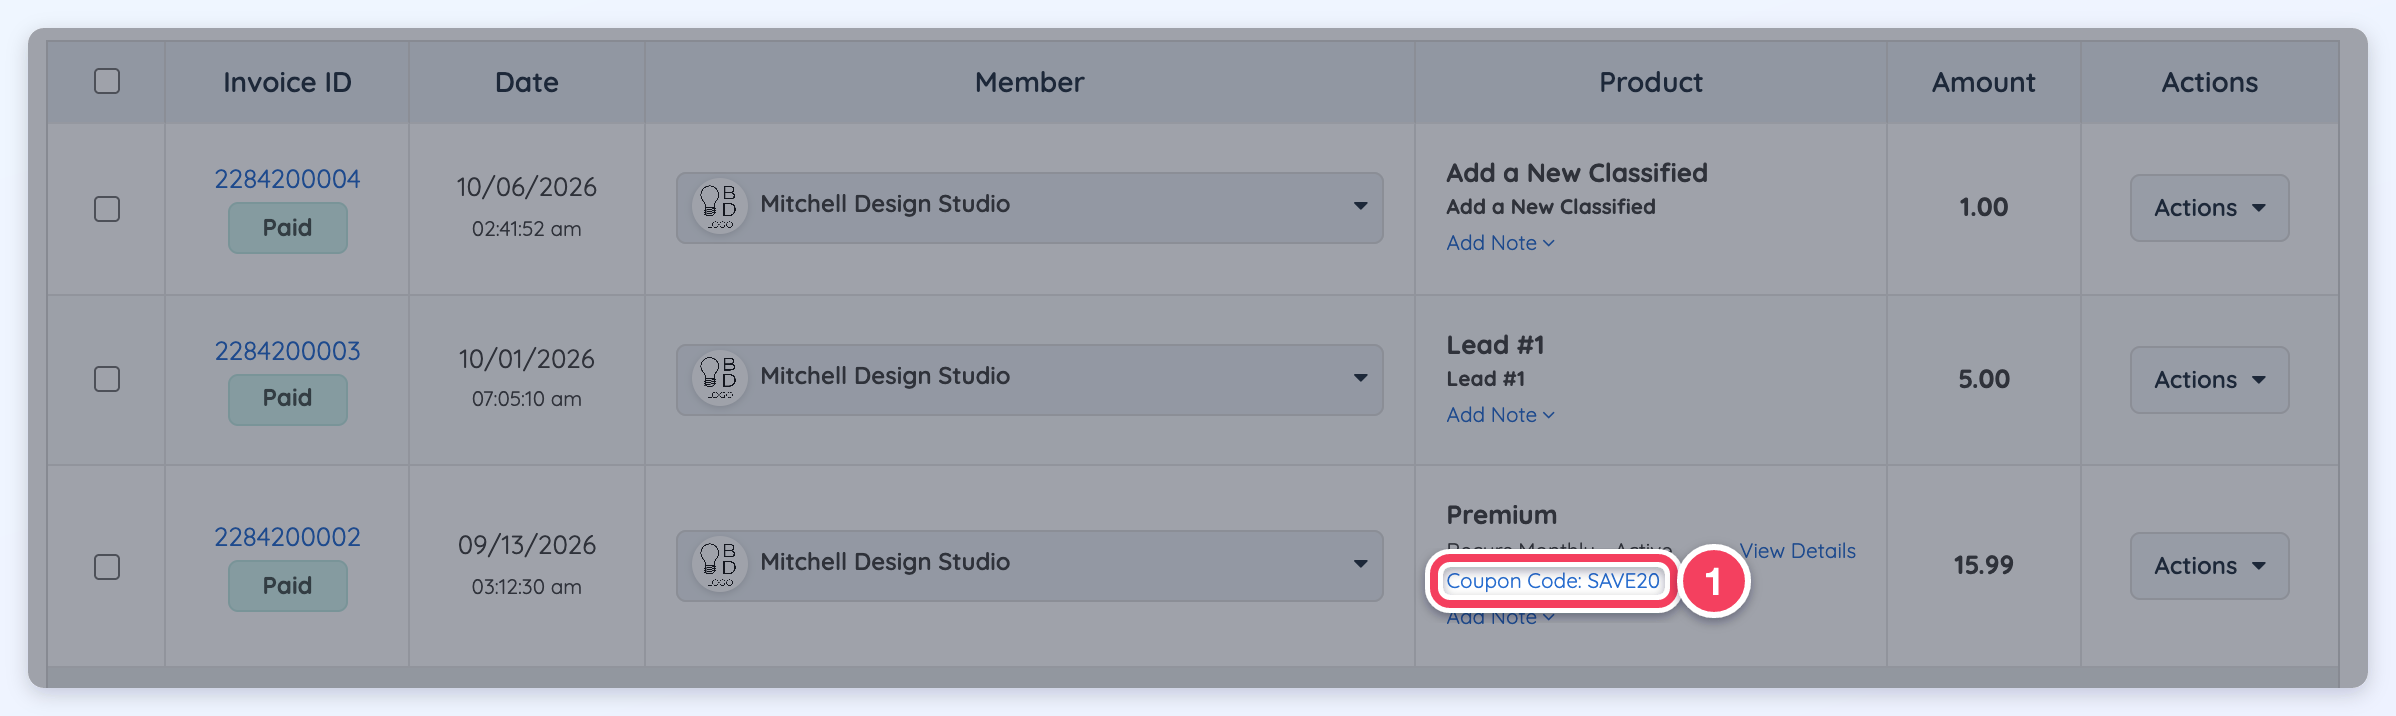
If a member used a Coupon Code during the sign-up process, the code used in this transaction will display as a clickable Coupon Code: <code> link (1) that opens the coupon in Finance » Coupon Codes: